November 26, 2023

Christmas cards

welcome this Sunday 

How is your Christmas planning are you getting organized the count down now begins

 This morning Julie is sharing two beautiful cards with us today and her awesome you tube tutorial so click the link below

Welcome Julie


 Good morning


I have two Christmas cards to share with you today.
They are different styles but both use the same Poinsettia die 


The first card has a see-through front panel with a filagree die cut in fill
I have also embossed the frame that sits on the front of the card
The Poinsettia is cut from pearlised gold cardstock


The second card uses paper's from Denise's latest release "Enchantment"
This is a more "Shabby chic" style card but once again the Poinsettia die 
works so well.
I have also use the Leaves die with the Poinsettia die


Till next time
Have fun and stay safe
Hugs
Julie

November 19, 2023

Christmas Reindeer

what a beautiful day we are in for here in Adelaide hoe your Sunday is well spent. I have spent the last week trying to get the Christmas decor up, which requires a little moving of furniture around to make space for my tree. So yes we are trying to get some Christmas spirit happening I feel it is happening a little quicker this year.

Today we welcome Sonia back to the blog with her little bit of cheer.


I can’t believe how quick this year has gone by and how close Christmas is.

Well, I promised a Christmas Themed tag in my last blog post and here it is.


I hate throwing out scraps of paper so if I can I use them to make flowers and leaves to decorate my projects with.

From the Story Book Collection I used Princes for a Day paper to make my purple flowers using Denises Poinsettia die set. I added extra ink to the paper to achieve the colour I was after. I cut poinsettia leaves out of, In a Castle paper and once again added different green ink tones to achieve the look I was after.


When Densie first bought out the dome Chipboard, I felt it would be fabulous for a shaker project. So instead of doing it on a card I decided to do it on a tag.

First of I covered the front of my tag with a piece of paper from Cogs of Time, Overcast and on the back, I painted the tag blue and stenciled on some stars.


Then with a Poinsettia stencil I had I used white gesso and placed some on the paper to show up in the background. A section to the left and two smaller sections on the right. I adhered some lace across my tag around 4” from the very top.


  • Next, I started working on my picture for inside the dome. I painted the background in blue and added some stars. 
  • I used Denise’s, Fir Tree chipboard set for my trees and Doe & Deer. I painted the trees and I gesso and inked the deer's
  • The small Merry Christmas was painted in silver. 
  • Acetate was used to create the window effect behind the front section of the dome.
  •  Using chipboard and double-sided mounting tape I created the height on the dome edges to create it into a shaker. I then painted them in black, so it blended into the top.


I very carefully adhered the base of the dome to my tag then glued on the trees and Reindeers. Finally, I placed my snow sequins on a heap on the tag before I adhered the top of the dome to the tag.

Finally, I finished decorating with the flowers, leaves, wording and ribbon.

Thank you so much Denise for the opportunity to be on your design team this year. I have had a blast. I hope everyone has enjoyed the projects I have made.

Wishing you all the most wonderful of Christmases and a Happy New Year. 

Cheers Sonia


Field Days

today we are sharing a layout from Tina

I love the way Tina's layouts all randomly full into perfect placement this layout 

thank you Tina 


 I started with base paper time warp from the Cogs of time collection. 

I then grabbed out my bag of scrap papers to make my layers. 

One of the things I love about Densie's ranges is that the all work together so I know no matter what papers from what range it will still look great together.

 I then painted some light globes and cogs black.

 I used waxes to give them some colour. 

I took a ute from a cut apart sheet and some pieces from 49 and market , available in Denise's store for my embellishment clusters . 

Thank you for stopping by!

October 26, 2023

Acrylic Tag

 This Sunday just gone it was Sharon turn on the blog she has created a gorgeous Tag 

Welcome back Sharon


Happy Sunday Everyone,

I decided to use one of Denise’s Acrylic Tags for my D.T. Project. I started playing with paper and it was looking pretty but I decided to do something different and see where it took me.

Step 1. I roughed the surface a little with fine sandpaper.

          2. Then I used a brick stencil and added white gesso.

          3. After the gesso dried, I randomly used Copper Texture Paste here and there and also, I placed some clear crackle paste on the white areas, then a minute with the heat tool.

4. I then distressed the bricks a little with grey acrylic paint, this step is optional.

5. I then finished my brick wall with a rub of Patina Anticante and I now had a vision of my finished project.

6. I made some clay moulds, using a terracotta colour. I decided to use leaves, flowers and a little bird.

7. After the clay dried, I added some of my Patina paste to highlight the detail.


To finish, the fun part begins.,

I had some 49Market Acetate leaves from Denise so I used a few of them & I glued these first and then I secured the moulds with Helmar 450 glue. The glue also gave me time to tuck under some dried ferns and nesting material, some artificial blackberries etc., use whatever is in your stash or garden.

I finished by adding a photo into a little frame. I then made a little envelope and placed it under the frame for some extra dimension. I finished with some wording and a paper butterfly.

After I had everything in place, I used just a little hot glue under the moulds & the little frame to secure it all.


Shaker Card


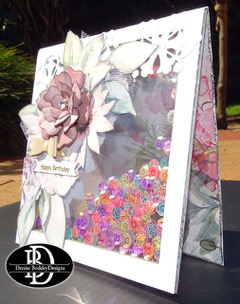
Today we get to Welcome Julie back to the blog with this great shaker card


 Hello hello

Today I have a shaker fronted card that you can see straight through

This project is a design team project for Denise Boddey Designs

Denise Boddey Designs website 

Denise Boddey Designs Instagram

Denise Boddey Share and Inspire Facebook

Denise Boddey Facebook


I have fussy cut an assortment of images from Denise's paper ranges to embellish the card.

I have also used the Primrose die and the Flower Background die.


You can see my process video here https://youtu.be/JofA26KOwXc


Thank you for dropping in today

Till next time
Have fun and stay safe
Hugs
Julie

October 9, 2023

Butterfly dreams

 Today we welcome Debra to the blog sharing a beautiful, bright and cheerful layout using a lot of Fussy cutting ephemera to set the scene on her page 

Welcome back Debra


thank you Debra for your lovely page full of inspiration


October 8, 2023

Christmas is not far away

 I am not sure if Christmas is starting earlier this year or is it I am not just ready to think about it. However Sonia is getting organized and has some Christmas cheer to share with us this wonderful Sunday morning lets welcome back Sonia to the blog 


HoHoHo it’s time for some Christmas cheer and Christmas will be here before we know it.


There is nothing like a hand made wreath to decorate your door,  hang on a wall or gift a friend. I have made one to decorate the inside of my door as afternoon sun hits the outside.

As I have a red door I new I wanted to make white poinsettia flowers for my wreath and I love the Australia feel of the gum nuts and leaves.

I had two sets of the poinsettia chipboard flowers from Denise Boddey Designs. From each set I painted the small flower in white and then added a bit of gold wax to the edges. I then used Denise’s poinsettia die to make poinsettia flowers in white card stock and attached the two flowers together finishing with a gold center.

I had four packets of chipboard Gum Leaves also from Densie that I painted. Lastly, I stuck together two of the large Merry Christmas chipboards and painted in gold to match the flower centers.


Using my hot glue gun, I attached the leaves to my gold ring (bought from Kmart in Australia), then added the writing and flowers and finally decorated with the ribbon. The wreath was quite quick to make the painting of the leaves took the longest however the paint does dry pretty quickly on Denise’s chipboard, I think.


I can’t wait to see what wreaths you all make. Don’t forget to join and post pictures on DBD Share and Inspire Group https://www.facebook.com/groups/1405179449837082/ 

My last project for 2023 will be an inspired Christmas themed chipboard tag to decorate your home with which I can’t wait to share. 

Until then have a fabulous day. Sonia


September 24, 2023

Today we welcome Tina back to the blog with her entomology tag


 Happy Sunday everyone. 

For today's project I started with the clear entomology tag kit. 


  • I only used 3 of the butterflies supplied in the kit. 
  • I painted the tag in teal and navy as well as adding some stenciling. 
  • I layered up cutouts from the Christmas sheets along with leaves cut from various papers using Denise's dies.
  •  I layered in some 49 and market acetate leaves 


  • I embossed down the centre of the butterflies, then painted them and added waxes.
  •  lastly I coloured white flowers and layered them all together. 


When using these tags, as they are clear you need to be aware of the back as they can been seen from both sides. As this is going on a wall I wasn't too concerned. Although looking at the tag it would be easy to add a few bits and it could be used from either side.  

Thank  you for stopping by!


September 17, 2023

Dreams

 Well spring is warming up here in Adelaide we wake to the sound of chirping birds  very busy in our trees. Happy Sunday everyone hope you are having a lovely day 
Today we welcome Debra back to showcase her layered delight


Another layout with lots of fussy cutting, using the beautiful Daydream Story Book Collection.
Layers of die cuts and fussy cut pieces were used to create my layout. I added extra beads etc. to the
background, Leaves have been coloured with stickles and Extra flowers have been added


Thank you for dropping by hope you liked my layout


Debra