Just a little wintery today here in Adelaide perfect time to sit in the craft room and I think I may stay in my pajamas all day and just be cozy and comfortable my dressing gown has glue and a bit of paint on it which now is my crafting dressing gown. Today we welcome Sonia back with an off the page project very much my colours and combination pastels and mix media

Pastel pretty was the
name of the game this month. I have to say not my usual colour palette however
I really enjoyed working with these very pretty, light colours.
I started off with a
big can of tomatoes. Obviously, the tomatoes I used for cooking and the can I
decided I wanted to repurpose it. My can opener (Tupperware) opens the can with
out leaving any sharp edges which was perfect for my project.
First, I wrapped the
can with some old lace and stuck it down with gel medium. I then wrapped 2
panels of Ali lattice chip board around the middle. The chipboard did not quite
touch in the front so I overlayed the gap with a Romantique Flourish laid
sideways. Chipboard is so great for projects like this as it has some
flexibility.
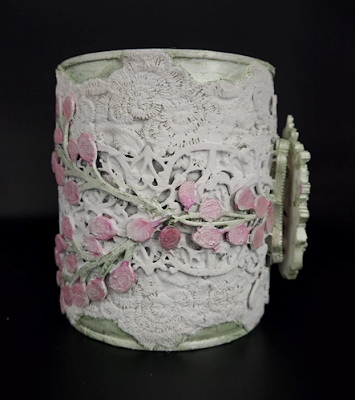
At the back I used 4
pieces of Button Leaves chipboard as per picture.
At this stage I spray
painted all the outside of the can white. I have also done this before just
with a paint brush however it does take a bit of time to get into all the nooks
and crannies.
For my focal point
for the front, I knew I wanted to use a resin mold piece I had. Denise Boddy
Designs stocks a great range of Prima molds. Don’t hesitate to contact Denise
if you can’t find what you are looking for on her website.
I stuck a plain resin
frame underneath my focal point and at this stage I also felt I needed
something else around the sides from the front to the back, so I added a
Berries chipboard piece on either side of my focal resin piece. I then sprayed
the whole can once again in white.
After everything was
dry, which honestly did not take long I added some very light green to the
steam part of the button leaves chipboard and I made out the leaves where
flowers and added a couple tones of pink to them.
I think this project
would make a wonderful gift for a Mum or Grandma on Mother’s Day filled with
flowers, lollies, or baked cookies. Also, could make centerpieces for a wedding
even using only a 400g tin.
If you are wanting to make pretty things for your craft
room this is also a great paint brush or pencil holder. So have fun playing
with this idea.
thankyou Sonia
for a great project and awesome concept