
Today we welcome back Sharon to the blog with a lovely gift idea

VINTAGE BAG
Cutting 2 sheets of black
cardstock 8in x 7.5 inches.
Score @ 1.5 inches on both sides
and the bottom.
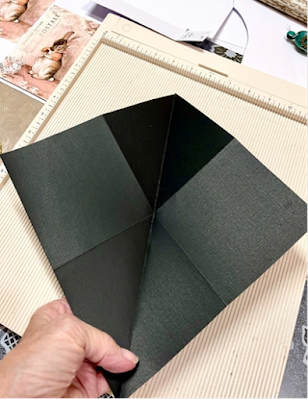
Cut 1.5 inches up from the base,
cut along the lines.
Cut diagonally on both the edges
to create a fold to form your box as per image.
Use double sided tape and glue to
adhere your two sheets to form your inner bag, view image below and on the next
page.


Cut 2 bodices out of black cardstock. I did mine freehand,
but I have attached an image below.

Cut a black strip of cardstock from your left-over cardstock 30cm long x 2.5 cm W, this is for your handle.
Take your 2 bodices, trace out your shape on your printed
paper from Denise Boddey designs, glue these on top of your black cardstock
bodices.
Add your decorative lace to the front and back of your
bodice as per image.
Add more lace to your long black strip and this is your
handle, attach this to the sides of you bag with two split pins.
To decorate the front of the bag I added the telephone box,
a cog, a butterfly, some small cut out flowers and a bodice from the fussy cut
sheet.
I added white light lace to the back of the bodice,
gathering as you glue – I used hot glue for this step. I added some gold
glitter around the top of the little bodice and down the zip area & added a
zip pull – this is optional of course.
I cut an opening into the telephone box to make a door opening and added my flowers and cog sticking out of this opening. I added a split pin attached to a little chain into the cog and another into the cog on the paper please see the image below. Glue your bodices to the front and back of the box and add your butterfly. I added some glossy accents to selected area. Your bag is complete.

my Card

Now we have our card, glue some decorative trim to the
bottom edge of the front of the card and to the back of the card. Add some
ribbon or lace to the middle of the card as per bottom right image, I used hot
glue again for this. This is the closure, just tie into a bow.


Glue the top left square onto the card and the bottom right
square.
The other 2 squares I have cut the paper in half diagonally,
I glued the top triangle to the cardstock and the bottom triangle I have used
double sided tape only around the edges leaving no tape at the top to give us a
pocket to hold a note or money.
Now turn over and cover the back square of your folded card,
tie your bow and you are finished. You can always cover every square of your card,
but I like to leave some.
room for photos to be put on.
I thought I would share another idea; I also use the Bodice
template to make beautiful lace stand up cards with a magnetic closure. I
noticed Denise has some lovely lace ladies.
Smiles,
Sharon Himmighofer/Vintage Book Décor


