Hope you are well this Sunday and the week gone has treated you nicely.
Today we get to welcome for the first time on the blog Sonia
This month I have
used. Guage Large, to make two 3D Gauges.
The first one
(purple) I painted all the pieces with purple paint and then silver
embossed front and back circle and top of gauge piece.
The paper used was from
the Story Book Collection to create an interest on the front of the gauge. I cut a
half circle from the Daydream paper using the small roses and leaves as my
feature.
From that same paper I covered the lower front section of the gauge and
then ran it through an embossing folder which I had inked to create the
texture.
I used a small piece of paper from In A Castle (green side) and
adhered that to the hole in the bottom section that was embossed. I added
purple wax to the gauge pointer to make a deeper purple colour.
Bling in the
centre and an upholstery pin (I cut of the back of it), was also added to the
front of the gauge.

Finally to finish the front of I added 3 flowers so I had
something to adhere the bee to. I love Bees and would normally do a Bumble Bee
yellow stripped body. For this card I decided to do a Blue Banded Bee for
something different.
As I did not want to
put this gauge on a card front I made my own stand so I could stand the gauge
up. Then I white embossed the square snowflake from Snowflake 3 chipboard and
proceeded to decorate with flowers, leaves and a sentiment. I personal would
love to give this to a special friend.
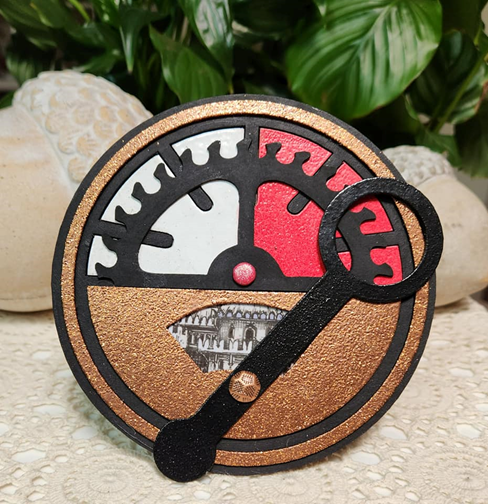
The second gauge I made was more aligned for giving to a male.
The embossing was a copper glitter powder and I white and red embossed behind the gauge and added this extra piece in.
Once again from the Story Book Collection, paper Chapters I cut out a piece of the black and white castle to put behind the bottom curved hole and I also cleared embossed it. Another upholstery pin was added and a brad to finish off the front.
Once again I made a
stand and decorated the back using Steampunk Keys chipboard and a heart from
Angel wings Petite. Wings of key painted a dark grey and all other pieces
embossed.
thankyou Sonia for two awesome projects
and thanks for the visit to our blog