May 21, 2023

Vintage Bag

 Today we welcome back Sharon to the blog with a lovely gift idea


VINTAGE BAG

Cutting 2 sheets of black cardstock 8in x 7.5 inches.

Score @ 1.5 inches on both sides and the bottom.

Cut 1.5 inches up from the base, cut along the lines.

Cut diagonally on both the edges to create a fold to form your box as per image.

Use double sided tape and glue to adhere your two sheets to form your inner bag, view image below and on the next page.


Cut 2 bodices out of black cardstock. I did mine freehand, but I have attached an image below.


Cut a black strip of cardstock from your left-over cardstock 30cm long x 2.5 cm W, this is for your handle.

Take your 2 bodices, trace out your shape on your printed paper from Denise Boddey designs, glue these on top of your black cardstock bodices.

Add your decorative lace to the front and back of your bodice as per image.

Add more lace to your long black strip and this is your handle, attach this to the sides of you bag with two split pins.

To decorate the front of the bag I added the telephone box, a cog, a butterfly, some small cut out flowers and a bodice from the fussy cut sheet.

I added white light lace to the back of the bodice, gathering as you glue – I used hot glue for this step. I added some gold glitter around the top of the little bodice and down the zip area & added a zip pull – this is optional of course.

I cut an opening into the telephone box to make a door opening and added my flowers and cog sticking out of this opening. I added a split pin attached to a little chain into the cog and another into the cog on the paper please see the image below. Glue your bodices to the front and back of the box and add your butterfly. I added some glossy accents to selected area. Your bag is complete.              


 my Card


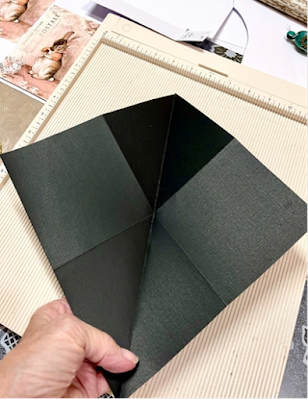
Cut your black cardstock - 8.5 inches x 8.5 & score at 4.25 inches rotate and score again. Now fold diagonally - score and burnish. Your card will close as per bottom image, just give another score to the folds to assist easy opening and closing.

Now we have our card, glue some decorative trim to the bottom edge of the front of the card and to the back of the card. Add some ribbon or lace to the middle of the card as per bottom right image, I used hot glue again for this. This is the closure, just tie into a bow.


Now we just need to cut your printed paper to fit the squares – 3.75 x 3.75 square.

Glue the top left square onto the card and the bottom right square.

The other 2 squares I have cut the paper in half diagonally, I glued the top triangle to the cardstock and the bottom triangle I have used double sided tape only around the edges leaving no tape at the top to give us a pocket to hold a note or money.

Now turn over and cover the back square of your folded card, tie your bow and you are finished. You can always cover every square of your card, but I like to leave some.

room for photos to be put on.

I thought I would share another idea; I also use the Bodice template to make beautiful lace stand up cards with a magnetic closure. I noticed Denise has some lovely lace ladies.

Smiles,

Sharon Himmighofer/Vintage Book Décor


May 14, 2023

Romantique Reds


Happy Sunday hope you had a lovely day together with your family celebrating Mothers Day or just in general enjoying the beautiful Autmn weather we had today
today we welcome Debra back with a gorgeous layout 


 I have used 2 different papers, from the Le Jardin Romantique collection.
 2x Enchanted Florals (I fussy cut one of these, the other I used the reverse for my background)
1 x Song Blossom (I  fussy cut the floral pieces )


The biggest flowers I separated from the floral pieces, rolling the edges slightly,  adding gesso lightly to the flower edges   and microbeads and other small beads to make the flower centers
 These flowers sit a little higher than the pieces that surround them.


The Ornate Gate Chipboard I heat embossed using chunky gold embossing powder, to give a rustic feel.
I also fussy cut the photo, so that it would not overwhelm the rest of the layout.
I layered all my pieces so they sit at different heights.

I stenciled the background around my fussy pieces, using texture past and 2 colours of oxide ink, to add extra interest to the layout.


May 7, 2023

Julie's Cards

 Happy Sunday this morning we welcome back Julie to the blog with a couple of cards


Good morning

Today I have a couple of cards I created as part of my 
Design Team work for Denise Boddey Designs
I have painted both sides of each of these with white paint.


The second card is a variation of a card I made a couple of months ago.


The paper I have used is After the Rain from the Elegance Collection

The card bases are created using 300gsm Smooth white cardstock

The flowers were created using Craft Barn - Primrose stamp and die set

I stamped and heat embossed the flowers onto some of the patterned paper
then used the dies to cut them out.


I have used the same heat embossed flowers to decorate this card

All of the details are in my video
Thanks for joining me here today
Till next time
Have fun and stay safe
Hugs
Julie


April 30, 2023

Bird Feeder

Happy weekend days are definitely getting shorter and colder we pruned back a lot of garden ready for winter was just was just about to prune a branch off until we saw a birds nest with the bird sitting in it best come back to that one later on. this leads me to Sonai's two awesome projects 
 Welcome back Sonai 
The bird feeder will be coming out from retirement after this great inspiration 
Bird Feeder here we come. This month I have made a X-large tag using some paper from the Elegance Paper Pack and the flat birder feeder chipboard.
I covered the tag with Chic paper using the left-hand side. Then I started to complete all the other components I would need.
For the bird feeder I painted the building in blue and stippled a little cream paint on to make some texture. Once this was done I used 49 and Market Blendables 01 over top. I made my own galvanized iron paper which I mounted and attached to the roof section of the Bird Feeder.
From the Style sheet of paper, I cut the blue flowers out and from the 49 & Market Botanical Laser cut elements I picked out some flowers and butterfly’s I wanted to use as well as the fence. Behind the fence I stuck several layers of mounting as I new I would need this once I assembled everything together.
Chipboard blessings, I used the word Blessings from the collection and covered with Nuvo Embellishment Mouse in Seaspray Green and Cornflower Blue. Blending the two colours together in the middle. (Nuvo and 49 & Market Products also purchased from Denise Boddey Designs).
I made a little resin bird and painted him up and found some wonderful leaf lace that Denise had died to use in my background as well.
Construction. I stuck house down first followed by the piece of lace across the front. I then had a play with my cut elements and fussy cut flowers to decide how I wanted to place them. I layered them attaching the pieces I wanted flat first and then slowly mounting the rest up. Finally, I added the wording, butterfly’s and the little blue bird.


Some time ago Denise also had a bird feeder that was 3D which I still had in my stash.  I already had my ideas of using bark from my garden as the roof and I knew I wanted to attached it to some wood. 3D is a little harder to construct as you have to have patience for the glue drying time and my roof in the end did not line up on one side for the chipboard hole however because I was covering it with the bark it didn’t matter. I loved adding lots of other fun elements including gum nuts and dried leaves also from my garden. I have included some pictures for you to see what it ended up looking like.


thanks Sonia
and thanks for dropping by


April 25, 2023

The Simple Life

 A little late again with this Share with all of the public holidays lately I am not sure what day it is. feeling out of Wack. 

 How ever today being Anzac day I do believe this is a great share for such a day. I just wanted to take a minute to recognize those who stayed behind at home and stepped up to support the country in multiple different ways whilst those who left for war left many a gap how hard it must have been waiting for your loved ones to return, as their lives still went on.

Image of an advertisement for Land Army

The Australian Land Army 

More than 3,000 women volunteered in the Australian Land Army during World War II.

Their duties include anything from dairying to driving tractors, the work required of the land girls was varied. But one thing was certain — it was quite unlike what was generally expected of women in the 1940s.

"They were some of the most extraordinary pioneers because they were doing things and transforming our understanding, particularly for women, of what women could do," they were a part of our Unsung Heroes 

unsung heroes

Another long standing tradition is the baking of Anzac biscuits both here and New Zealand. This is my simple way of remembrance and the recipe has been passed down from my mother to my daughter and it has coconut in it, something I believed to be normal.  But the first recipe for an Anzac biscuit containing the desiccated coconut is recorded to be from the city of Adelaide in 1924.[17][18] 

So having said all of this Today we welcome back Tina  with a special layout that says more than the perfect placement and colour choices, she has made. Her Page tells a story and that too is what Scrap booking is about. 

Thanks for dropping by and seeing my latest share. 


  • I started with a sheet of time warp paper from the Cogs of time collection. 
  • I added some stenciling over the top.
  • I then painted my chipboard black and added waxes from Finnabair. 
  • I layered my photo with various papers and a piece of denim. 
  •  I cut my chipboard up and layered it.  
  • I added some 49 and market pieces, a title and then splatters.

 thanks for stopping by

Tina