August 27, 2023

A Good Book

 Hello  Everyone hope this finds you well, today we are sharing an awesome Project from Sonia just love it 

As I have been working on some books my self I can appreciate  the amount of love and time that Sonia has spent fussy cutting for this project. 


A good book in hand and a coffee near buy brings joy to my heart. I have always loved reading and making books as beautiful gifts for friends is also a favourite thing of mine to do.
 
When I saw Denises’s paper collection ‘Cogs of Time’ I new it was perfect for another book but this time I wanted to make it a lot bigger than I normally would. More like a real size book. So, as you will see  did.

You can use any of Denise’s papers for the book layers. It works well if you use so light and dark colours mixed together. This is what I have done. I even used papers from Denise’s different collections.
 
Cover of the book is 12” x 8”. On the 12” long size score at 6”, this is the middle of your book. I have 5 layers in total and each layer comes down by ½” each time. Second layer would be 11.5” x 7.5” and scored at 5¾” and so on for the next 3 layers.
 
Next, I really like to rough up and rip and curl paper. Just to give it a lot more interest in the layers.


I did this top left, bottom right and on the sides I did it left bottom and right top. Except for the cover piece (bottom layer). I also used a silver paint pen around the edges of the paper.
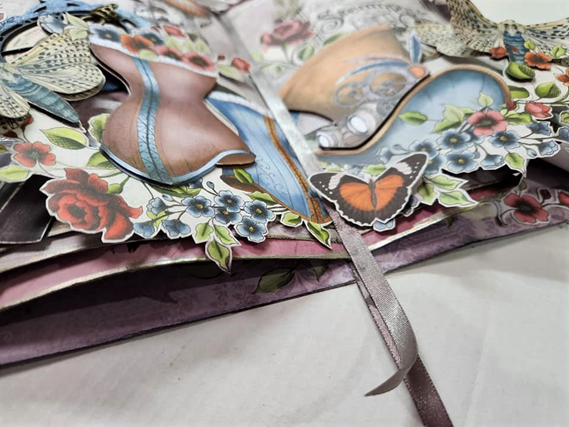
 
Shaping the pages makes the book look more relistic I have a very small rolling pin that I wrap my paper around from centre out to create shape before I stick my book together.  Then I stick the spine of the book together. I do like to use a piece of ribbon, lace through the middle as well. This get attached to the second layer before I attach to the cover at the back only at this stage. Once all layers are attached and dried, I move on to holding the book shape in place.


To do this I stick the second page to the cover to hold the shape, glue is near the edge of the paper. I do this one side at a time as you need to hand hold until the glue holds.
 
As I go up the layers, I put the glue further back in toward the centre so I can slide bits and pieces in between the pages of my book. See below, top right of picture.


Now it’s time to fussy cut to your hearts content.
Cogs of Time
Elements – I cut out cogs, butterflies, blue moths, light bulb, and flowers.
Travelling in Style – Circle on left hand side became the face of my chipboard clock, bottom section was spread across the whole bottom section of the book. I cut a second pink corset, hat and two moths to layer up with.
Postcards – Steampunk Time panel is the cover of my book. Corsets from centre panel also used on front of book, Binoculars used inside book, hot air balloons inside book. So, I think you get the idea. You can use any pictures you like.
Cover of Book I added a strip of cardboard to give the appearance of a spine. You can also use fabric, leather, lace for this.
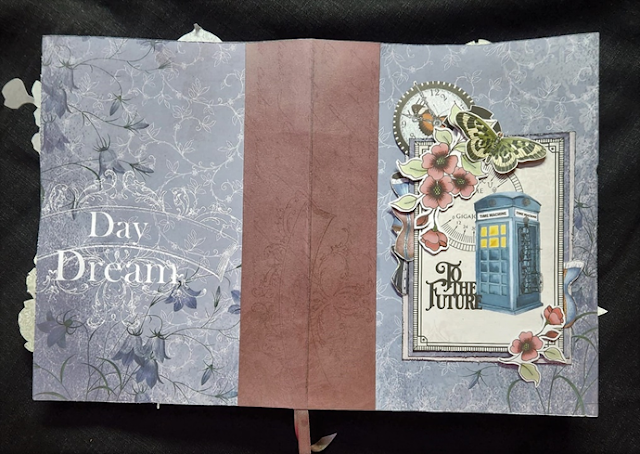


 hope this is has truly been inspiration for you 
thanks for taking the time to visit


August 13, 2023

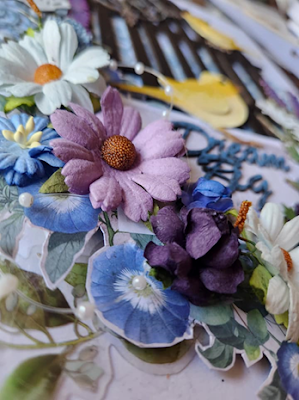
Tina's beautiful blue

 Happy Sunday hope this finds you well Tina is back today sharing a lovely layered layout she has created


Products used:


Deco half circle die
Delicate branch die
Gift of love chipboard
Herbs chipboard
leaves die
overcast paper - from Cogs of time
Chic - from elegance
various papers for layering
other products from shop
49 and market blossom rub ons


I took the overcast paper and added some rub ons.  I love the way the rub-ons meld into the paper. 


Layered some papers. Cut out and pulled apart some of the dies to add to my layers.


Punched out and made my own flowers.


  Coloured my chipboard with shimmer dusts. Punched out some  butterflies. Lastly I added some gold splatters. 
Thank you for stopping by.


August 8, 2023

Birdcage

 Hope this post finds you well 

Hello it has been a few weeks since we posted some inspiration, life is moving a little quickly with lots of tasks always waiting to be done.

Tonight we are sharing a lovely project from Sonia 


I love making pictures that I use as artwork on my walls, so this was my inspiration this month.


Products Used from Denise Boddey Designs

Glory Paper flower sections see below picture

49 And Market 56 pce Foliage

Lace

Nuvo Mouse on flowers and compass

Chipboard:-

Birdcage X Large

Birds

Dream Big Wording

Lavender a single and a double stem

Small Compass

Herb – larger flower in pack see photo, a single and a double stem


Following are two photos showing the elements I used.


I first prepared all my elements for my picture. I used Nuvo mouses to colour flowers, wording and compass. Then I painted the bird cage, birds and fussy cut the flower elements I wanted to use.


Assembly

The beautiful lace that Denise dies herself was attached first to my thick watercolour cardstock base. I had to add a little mounting tape to the bird cage top and bottom to compensate for the thickness of the lace. Then I attached the chipboard flowers on the left and right hand side of the birdcage. Followed by the fussy cut flowers, wording compass birds and finally I added flowers, pearls and twisted wire which came from the back of the daisy flowers. I love to add this to projects rather than waste it. In the end I also added a very small butterfly from the 49 & Market Foliage pack.


Thank you Sonia for this lovely picture


July 2, 2023

  Good Morning all and happy Sunday has been a little cold her in my part of the world winter has definitely set in this Morning we welcome Debra back with this beautiful layout 


 Hi Everyone,

Debra from the Denise Boddey Design Team here to share with you a layout I have created using lots

 of lovely products from the Denise Boddey Designs Shop.

I had lots of fun putting this one together


I used the the In The Castle paper from the Day Dream Story Book Collection.

I used the Shutters Chipboard angled behind my photos.

layers of fussy cut flowers and leaves surround my photos.

Raw chipboard sprigs are tucked in among the flowers , with extra small paper flowers added.

I used the Deco Half Circle Die, cut in gold glitter paper, tucked in amongst my biggest cluster.

To complete my layout I added the chipboard Title, Once Upon A Tine, embossed with gold embossing powder.

Products I used can be found at- deniseboddeydesigns.com

Hope you like what I have created.

Debra

sentimentalistscrappingjourney.blogspot.com

Thanks for visiting


June 25, 2023

Pocket folio

Happy wet and cold Sunday perfect day to craft all day and stay in your pajamas
This Morning we get to welcome Julie on the blog today.
Julie has a great you tube channel where she has a lot of tutorials  why not pop over and check it out 


Good morning

Today I am sharing a couple of two pocket folio I have created using 


One has a die cut front and the other is trimmed with lace.


For one I used Time Warp
and for the other I used Overcast

Each of the folios have two pockets inside and have machine stitching around 
the folio and pockets.


I have used fussy cut images from several of Denise's paper collections to embellish this folio
along with some lace and glossy accents

The front section of the folio was die cut using the Deco Half Circle die

I have stamped, heat embossed and die cut the flower to embellish this folio using the 

Here is my process video if you would like to see how I created these folios

Thanks for dropping by
Till next time
Have fun and stay safe
Hugs
Julie


June 18, 2023

Pastel Pretty

  Just a little wintery today here in Adelaide perfect time to sit in the craft room and I think I may stay in my pajamas all day and just be cozy and comfortable my dressing gown has glue and a bit of paint on it which now is my crafting dressing gown. Today we welcome Sonia back with an off the page project very much my colours  and combination pastels and mix media


Pastel pretty was the name of the game this month. I have to say not my usual colour palette however I really enjoyed working with these very pretty, light colours.

 I started off with a big can of tomatoes. Obviously, the tomatoes I used for cooking and the can I decided I wanted to repurpose it. My can opener (Tupperware) opens the can with out leaving any sharp edges which was perfect for my project. 


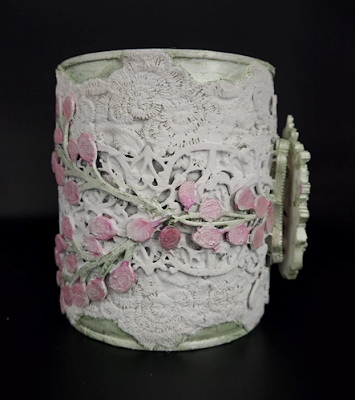
First, I wrapped the can with some old lace and stuck it down with gel medium. I then wrapped 2 panels of Ali lattice chip board around the middle. The chipboard did not quite touch in the front so I overlayed the gap with a Romantique Flourish laid sideways. Chipboard is so great for projects like this as it has some flexibility.

At the back I used 4 pieces of Button Leaves chipboard as per picture. 


At this stage I spray painted all the outside of the can white. I have also done this before just with a paint brush however it does take a bit of time to get into all the nooks and crannies.

 For my focal point for the front, I knew I wanted to use a resin mold piece I had. Denise Boddy Designs stocks a great range of Prima molds. Don’t hesitate to contact Denise if you can’t find what you are looking for on her website.

 I stuck a plain resin frame underneath my focal point and at this stage I also felt I needed something else around the sides from the front to the back, so I added a Berries chipboard piece on either side of my focal resin piece. I then sprayed the whole can once again in white.


After everything was dry, which honestly did not take long I added some very light green to the steam part of the button leaves chipboard and I made out the leaves where flowers and added a couple tones of pink to them.

I think this project would make a wonderful gift for a Mum or Grandma on Mother’s Day filled with flowers, lollies, or baked cookies. Also, could make centerpieces for a wedding even using only a 400g tin.

 If you are wanting to make pretty things for your craft room this is also a great paint brush or pencil holder. So have fun playing with this idea. 


thankyou Sonia

for a great project and awesome concept