May 30, 2020

Welcome Janet

Today we get to welcome Janet to the blog

This is Janet from Try it - Like it - Create it with a decoupage tutorial.

The decoupage paper I used was Quite Place. It is a part of the Out in my Garden set from Denise Boddey Designs. The one-sheet covered the entire project and was used in a few different ways. The Quite Place design has a colorful plant design with a subtle overall pattern. The different areas of design were used specifically on the birdhouse. The birdhouse makes a great decorative piece and there is a lot of attention to detail.

Materials:
  • Quite Place sheet
  • wooden birdhouse
  • green paint
  • sponge paintbrush
  • small paintbrush
  • decoupage glue
  • scissors
  • satin ribbon (green)
  • sparkle paste
  • UV resin
  • bird sticker
Directions:
To make the leaves have more stability, I covered them in UV resin and cured it.
Then I cut out the leaf design and set them aside for later.


Using a Foliage Green colored paint, I covered the birdhouse with a thin coat.

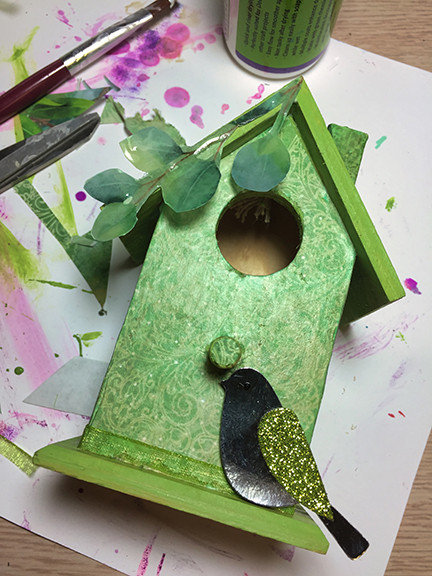
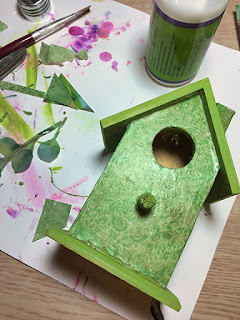
Here is the house painted.


I began to fit the subtle paper design to the sides of the birdhouse using decoupage glue under and over the paper.

Using a matte decoupage glue added a nice sheen to the paper.
Trimming the paper to the bottom edge of the birdhouse while the paper was wet left a rough edge which I will hide later.


The back of the birdhouse has a nice surprising leaf design.


I added the decorative elements to the front. The resin leaves at the top and a bird sticker at the bottom.
In the above photo, you can also see the ribbon wrapped around the bottom.
I used decoupage glue for all of these elements.
The chimney and the circled end of the perch are also covered with the designed paper.

I also decoupaged the bottom of the birdhouse, paying attention to details.

For a final touch, the roof was wiped with sparkle paste, I applied this with my fingers for a light coat.


May 23, 2020

Twisted Autumn Easel card

Hello again where has this week gone it has been a busy creative one for me.
how lucky am I for today it is my turn to share my project with you using my card toppers and some newly design chipboard. we have uploaded onto the Website some beautiful exciting new designs which I cant wait to play with some simple Celtic knots and some musical delights design with my husband's Guitar as inspiration. 
with my Easel card I decided to use my recently coloured piece for the front of the card which the tutorial on colouring is on my you tube channel https://www.youtube.com/watch?v=8mTkhH7cZhA I have teamed it with In the Garden Patch card Toppers
here are two cards made with these card toppers with another two to come just ran out of days in the week.
hope you enjoy my cards and tutorials


if you would like to see how I created this Easel card I have uploaded a short Tutorial to my You Tube Channel 
or if you would like to see the chipboard used head on over to Web Site for more information

hugs
Denise


May 16, 2020

Welcome Els

Today welcome Els
The project Els has created is a must see with little resources she has created a awesome album. and a tutorial to go with it here is a sneak of her lovely album.


 here is some links to her media hop on over 

Blog:        www.elsschutte.blogspot.com

Thank you Els for a fantastic Album


May 9, 2020

Welcome Aya

Today we get to welcome Aya 

Today Aya has created a card to share with us using the Steampunk Time card toppers pack .


 her steps for making this card are as follows
  • cut your cardstock into your desired size hers is A7
  • cut and adhere designer paper on the top of your card
  • fussy cut elements from the Steampunk Time paper like the clock and butterfly to embellish the card
  • she used some skeleton leaves for wings and paper flowers as well
Aya has created a tutorial video with more instructions on how to create this lovely card here is a link to Aya's blog https://ayaspapercrafts.com/

Thank you Aya for creating and sharing your card and a fantastic video with us show casing the Steampunk Time card Toppers


Available on our Website 

Until next Saturday


May 2, 2020

Very Excited Our First Design Team Post

What a great way to start off the month with our very first post from our newly formed 
Design team

Welcome Leanne

I am super excited and looking forward to being able to share all of the design team's lovely projects with you, every Saturday Morning.
Today Leanne has posted on her Blog a project that she would like to share with you. It is an altered paper mache birdhouse. Leanne has a fondness for birdhouses with a slowly growing collection. this was found tucked away in a cupboard and thought it would be just perfect to feature our products. She is delighted with the end result, and so are we. 
For more information on Leanne's beautiful Birdhouse
here is the link to Leanne's blog lets create little things
hop on over and Welcome Leanne 
just a sample of some before and after photos.


If you would like more information on the products used Leanne is happy to share as they too are listed over at Leanne's blog lets create little things

Available on our Website 

Until next Saturday
stay safe and take care 
Denise